Post by comrademp on Aug 3, 2007 2:05:45 GMT -5
The Soviet AK design has become widespread through out the world. Here we have the masterpiece of soviet design, this one manufactured and designed in the Deutsche Demokratische Republik (The DDR being East Germany). The MPi KM wasbased on the Russian AKM with plastic furniture and bakelite lower handguard which was standard issue for the Nationale Volksarmee. Later, the MPi KMS74 was designed which would replace the MPi KM. It never saw widespread distribution and not many were made. I have come forth to bring East Germany's MPi KMS74 to life.

I will most likely stay away from Bakelite mags, but there is always the possibility. [EDIT- I will probably obtain one and dye the stock and upper handgaurd and a new pistol grip dark brown to match the bakelite handguard]
Soldier traning with his MPi KM
www.gun-world.net/russain/kalash/foreign/ddr/20050710adf.jpg
Soldier during the Iraqi elections.

Iraqi practices with the MPi KM

Many MPi KM's dissappeared from DDR armoury stocks after the fall of the Berlin wall and the reunification of Germany. Many have been seen all over the world, many have turned up in the middle east and in asia. Even Finland has picked up a few MPi KM's for it's Army. Many MPi KM's while being decades old, are in mint condition. MPi KM's are one of the finest built AK rifles being up there with Russian and Bulgarian made AK's.
I had had seen the MPi KM furniture much earlier, didn't have much intrest in it, though the more I saw it the more fascinating it became. A guy who goes by the handle of DJ Mike Oz went and started a custom job, as many others were doing custom jobs to their AK's. I decided to do something unique and went with the MPi KM furniture. I looked around, finally found a great price on the furni, almost bought the set for $68 from another place. I ended up paying about $68 for the set but shipped and with a nice E. German blue sling.
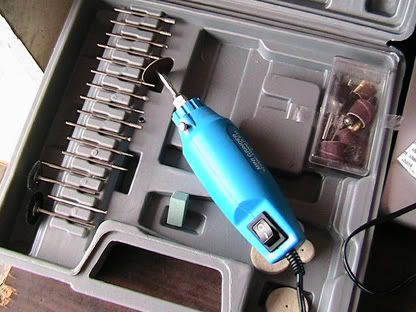
It sat in the closet for a bit until I bought a mini grinder/dremel from ebay. I waited one week until it arrived. The dremel looked cheap and crappy, but I went ahead and got it out and prepared for a day of modding.
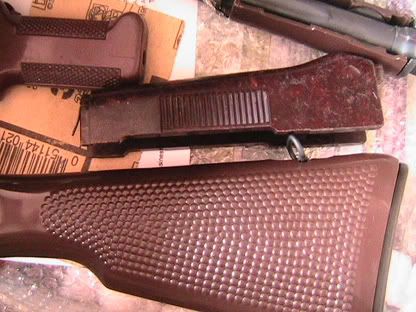
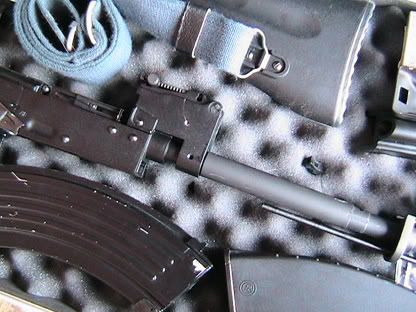
I got my box out with the MPi furni and got it ready for it's modding. It was a shame I can never use the pistol grip, it's quite nice. It's about half the width of the AS pistol grip.
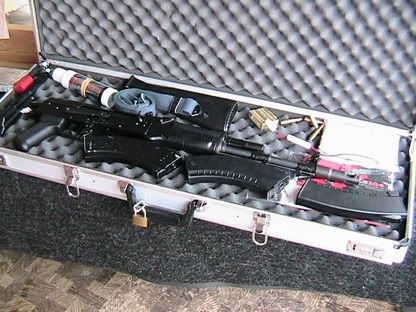
Got my gun case out, I like to keep it secured. I had my AK on hand to make quick adjustments and for easier fitting of the new furni.

I normaly keep my gun case full of stuff, I just find it easy to keep a few things in there so I don't have to look around for stuff in my "Airsoft Stuff" boxes.
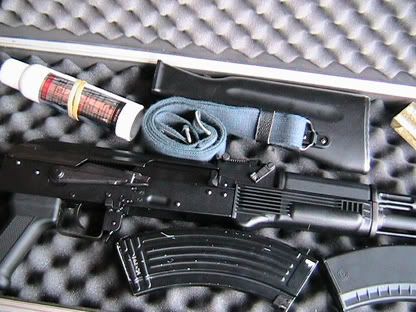
Partially field stripped my gun, again to make quick adjustments to create the best fit possible for the new furni. Earlier in the month I had taken the gun completely apart, put the RS lower handguard on the front and marked what excesses would be cut away. I suggest you do this if you are going to do something similar with a RK.
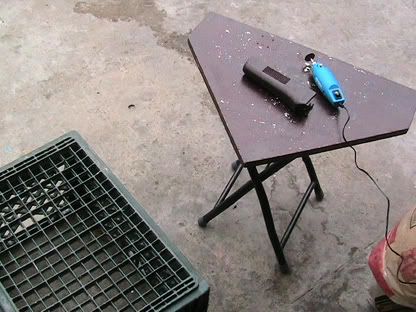
This was my work station for the rest of the day, the dremel was for indoor use and thus had to be plugged in, no matter, I had an outlet near by. I was working, blasting some good tunes, and creating something sexi.
I cut along the lines I had marked on the lower handguard and removed the excess bakelite from the tab at the end. The dremel took the bakelite on with no resistence. The bakelite dust and cut area ressembled wood which I found intresting.
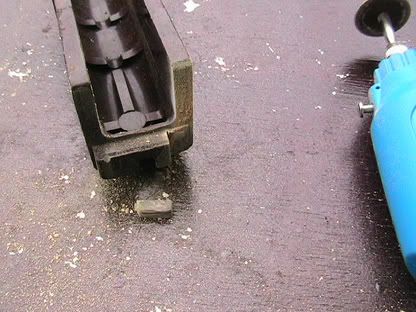

I got the tab just about right, having the gun on hand to make quick changes, I found that the tab needing more resizing.

I don't know about you guys, but I get ghetto birds (police helicopters) coming around often.
After going at the lower handguard for an hour or so I had pretty much finished modding it.

I had finished the back end, also sanded down the back of the handguard for it to be even and allow a clean fitment onto the gun. I also cut a bit of the tab itself off because it left a small gap between the handguard end and the reciever and didn't line up to the locking lever. Again, we can see the bakelite looking like wood.
I managed to close the gap between to the lower handguard end and reciever, now it's not noticeable at all. Only when you get real close and examine it closely. With the lower handguard in place, I had to adjust the front end to fit the retainer. I ditched the retainer spring as I had no use for it on an airsoft AK. I cut of a few mm of the lip, got out the sander and thinned the lips until the retainer was in place and the locking lever was good to go. The locking lever had no place to lock into since the handguard wall was in the way. I carved out an opening for it so the locking lever could engage a lock of the lower handguard. Also made a cut for a screwdriver tip to release the locking lever.
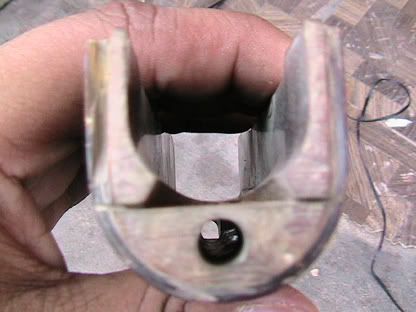
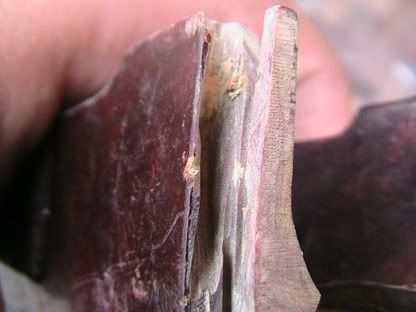
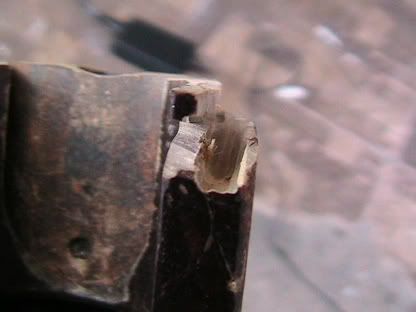
I got the lower handguard in place, it is pretty much done. I will take a sander to it a bit more to make placement and removal easier. The inside of the lower handguard snuggly hugs the outer barrel. The locking lever is in place and working. You can see the adjustments that were made to accomadate the lever.

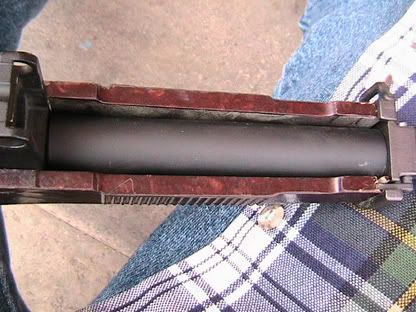

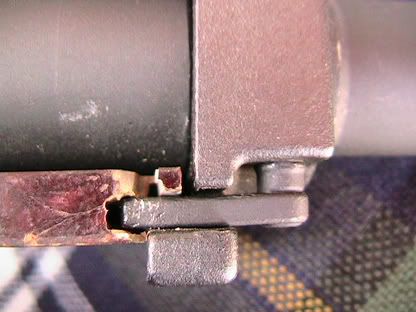
Along with being able to switch out the lower handguard, when using the MPi lower handguard, I don't need to use the little H piece that keeps the cleaning rod in place. The hole at the front of the lower handguard all the way to the rear of it keep the cleaning rod in place and looking good. Only downside to that is that I have to remove the FSB to remove the lower handguard because I can get the muzzle break off, thus the cleaning rod prevents easy removal of the lower handguard. I hope to fix this.
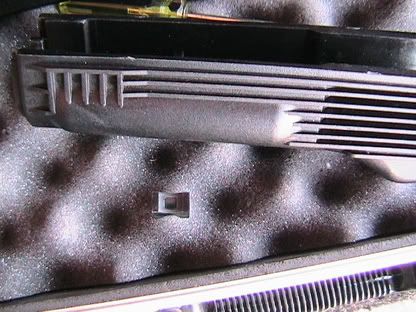
The MPi set came with a the upper handguard on the gas tube. The gas tube would fit on the RK with some modding, but the dremel which was supposed to be able to cut metal, didn't to much to it when I tested it. I decided to put it off and moved on to the stock. The damage you see to the gas tube is from me trying to remove the upper handguard from it from an earlier try.
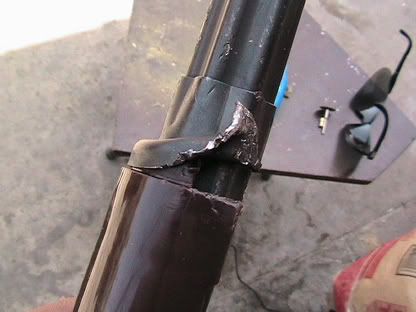
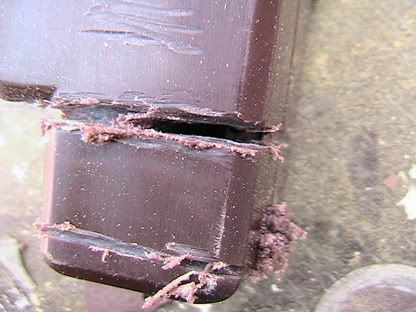
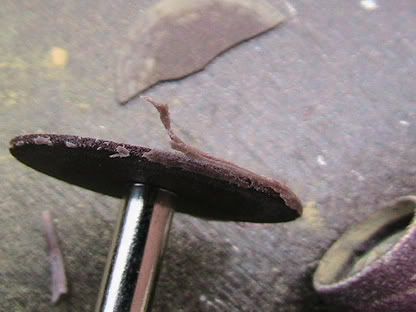
To the stock, the battle plan was simple. Attack the front. The stock is plastic, quite thick in places. I had made several cut in various places and gave up and made a new cut elsewhere. I was pissed that the plastic was giving me a hard time. It's not any easier because it's plastic. There are two step like parts at the fron of the stock, I would have to take out one step then the other. Since the dremel wasn't being effective at cutting on the flat surface, I attacked the corners. Progress here was slow but steady. It combined one thing I like and one thing I like (like=sitting on my ass, dislike=waiting along time for s***). I also had to stop often here because the plastic that was being cut chipped, melted and stuck to the cutting wheel where it instantly cooled down and bonded too.
I had started working on the stock from about 10 AM, it was around noon when I took a lunch break. I had me that panini thing I keep seeing on the tv with it's "uber cool" grilling tray in the microwave. I wasn't totally impressed, tho it was good. Also had me a side of dinosaur shaped chicken nuggets, what's manlier than that? Mmmmm, Dr. Pepper.

During this time I went over to a sexi fourm, read a sexi review written by a sexi guy about a sexi gun while listening to a sexi song. It was a sexi time.
I got of my ass, and planted my ass back infront of the work area. I managed to get the first step off, it wasn't that much work, just a lot of waiting. When it was weakened structually, I banged it on the ground and big pieces came off. I cleaned the end up of any big pieces still left.
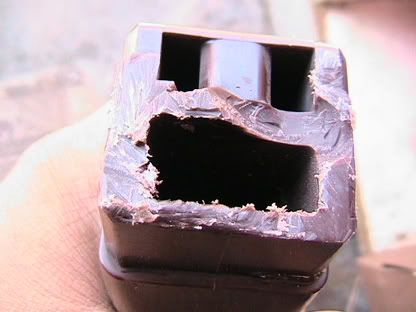
I attacked the second step, the plastic here was pretty thick and progress was even slower. The thick upside down T area from the previous pic, slowed me down the most. I attacked it from the front again, and then from the sides. I weakened it structually again and banged it until big chunks of it came off. This step I took hours on. Also didn't help that the cutting wheel was pretty frail and I broke them all by the end of the day. One even broke while I was still working and hit me in the face. Good thing for my shirt and eye protection.
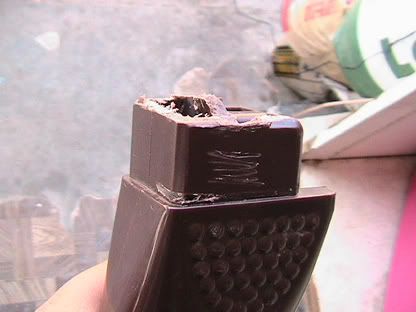
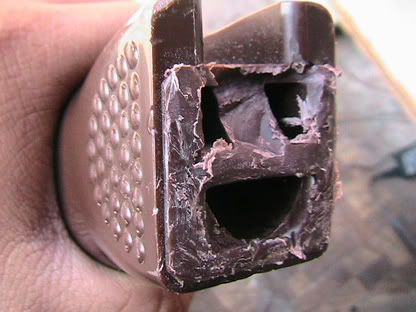
I thought about calling it a day, I said F*** it. I continued on.

Back to the stock, here you can see all the broken pieces from the stock "steps" and a few broken cutting wheels and ass loads of shavings and dust.

There was a pesky support inside of the stock that would impede any entering battery pack. I had to knock it out but the dremel couln't finish the job so I went at it with the screwdriver. I noticed that part of the inside of the stock was coming out. I said sh**, I see. I unscrewed the rear sling swivel and tugged until something came out. I got the part out, cut out the support. I like how that part had the threads for the butt plate screws. I popped it back in, aside from that one support on the part and a couple up at the very front (seen in the previous pictures of the front of the stock), the stock is hollow. Just have to be careful of one of the sling swivel screws that could dig into the battery pack.

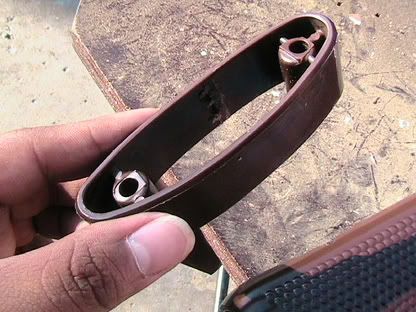
After that I wanted to call it quits for the day, again. I decided to try and get the upper handguard ready to go. After screwing with it trying figuring out a way to get it off of the gastube, I made it weak. Pounded the gas tube with a hammer, attacked the retainer lips and went to work with it with the dremel. It did cut metal, just at a slower pace than it did with the plastic. Finally I freed the upper handguard.
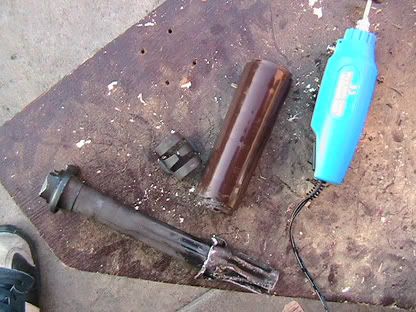

I then got the gas tube and retainers from the RK out to the table and sanded down and cut the lips at the front of the upper handguard. I came close to a good fit, then end of the upper handguard fit nicely right off the bat. I put the MPi upper handguard on the RK's gas tube and reatiners and put it on the gun, there was resistence but I pushed it and got it to fit into place. I then locked it in place with the locking lever for the upper handguard. I'll have to go back and sand it down some more for easier removal. The important thing is I got it on there.
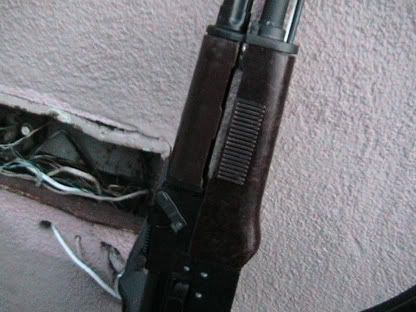
There's rough spots on the modding areas, but not enough to really bug me or ruin the gun's beauty. The first rough spot is the front of the upper handguard and the retainer. Ther rest will be on the stock. One thing about the handguards, the upper is a bright brand new looking brown plastic as is the stock, the lower handguard is a worn dark brown bakelite. This dosen't bother me, it's the space between the upper and lower. I wish the upper came down a bit more.
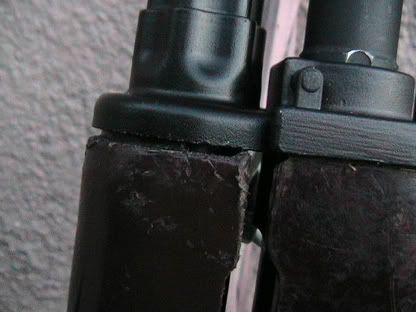
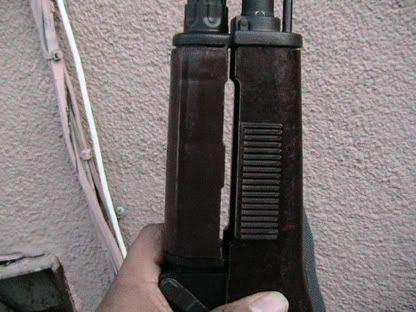
I got back to working on the stock, I finally called it quites as the sun was setting. Took some pictures and then I called it quits for the day. The time was 8:15 PM. I took today off because I broke the cutting wheels, and because my hands are sore as hell. I got some new cutting wheels and I'm going at it again tomorrow.

Here are the results of today's work: Got the handguards on and the stock now only needs the modding for the stock tangs.


There is still more to be done.
Future prospects:
Mod a RS AK74 FSB and use a AK74 muzzle break
Mod a RS AKM FSB and use a AKM slant muzzle break, creating the MPi KM (E. German AKM)
Use of a AK74 stock and Bakelite mags.
G&G 104 front end
RS AK74 wood kit
RS AKM wood kit
I orignally wanted to make the MPi KM, but issues with the front of the RK103 impeded this. I will find a way, acquire fund and make this possible
[EDIT- AK74 FSB and muzzle break is still possible but approx $150ish, i dunno. AKM FSB and slant muzzle, meh don't feel like chopping the barrel and threading. AK74 laminated RS wood is hella expensive so screw that, maybe Inokatsu. AKM wood is still quite possible]
EDIT: "Almost" COMPLETE *Vodka chug* Cheers!
I took the dremel to the end of the stock and wore away the bulges left over from the stock "steps".
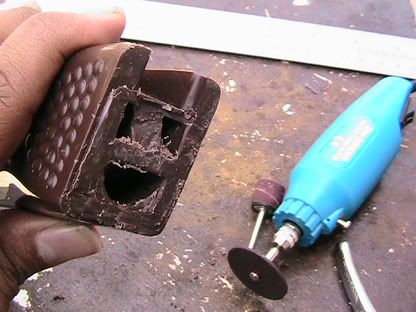
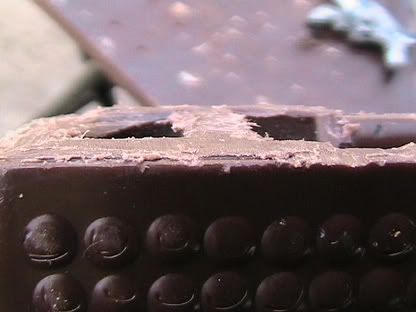
So to prepare for mounting the stock, I raced out the stock tangs on a piece of paper so I could make measurements. I got out some of the other attachments for my dremel, it was a good Idea. I used this piece to ware away the front of the stock tang to enlongate it to accomodate the RK's stock tang. I used some tape to avoid scratching up the stock. It got in the way so I ditched it later on. On the bottom I taped a piece of tape with the sock tang drawn on for easy dremeling out an area for the lower sock tang.

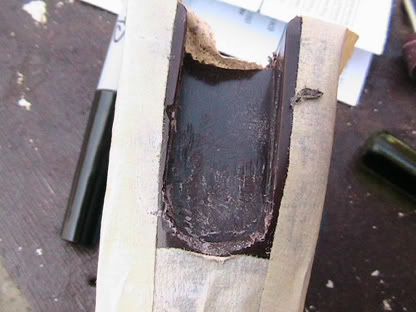

After going at it for a while I had gotten the stock tang ready. The end of the stock tang was where the tip of the screwdriver was. I later went back at it with the dremel to get it good. The hard pat was dremeling out an area for the lower stock tang. It was slow work done over a couple days period of working on it for a couple hours. I got it dremeled out and ready.


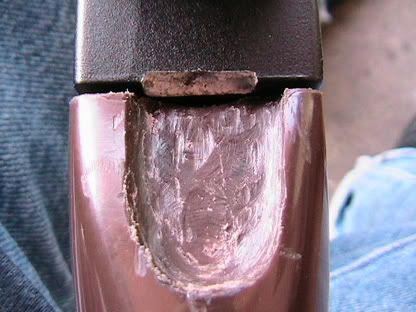
The bottom stock tang was kind of hard, the angle of the stock and it's hollowness made it a harder task. I dremeled as deep enough as I could, but it wasn't going so well. As we can see in this one picture, you can see light going through the oh so thin stock wall. I had to stop at that point. I tried getting the stock on the gun, it was a no go.

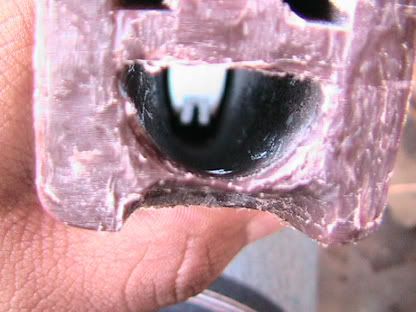

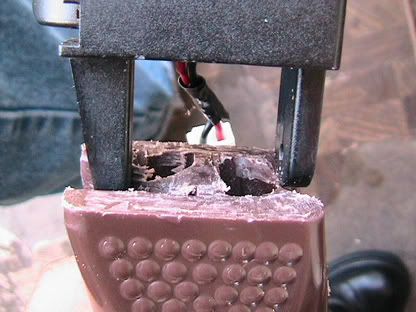
I went back to the top stock tang. I didn't want to proceed with the bottom because the stock tang area would be too weak and there were no supports there. The top did have a big thick T shape support right at the tang area. I went at it for a bit, I tried the getting the stock on and I kept coming really close. I got so close at one point that I went for it. The bottom of the stock is angled, this bent the lower stock tang until it broke. The only flaw I find in the G&G RK's is that the body material could have been better. Magnesium is nice and strong enough, but Steel would have been the obvious choice. I spent no time on this loss, I had a job to finish. I would have to fix it up somehow later. After a small chat with joe, I had a few ideas going on how to fix the problem. The fix being covered up with the glorious BLUE DUCT TAPE.

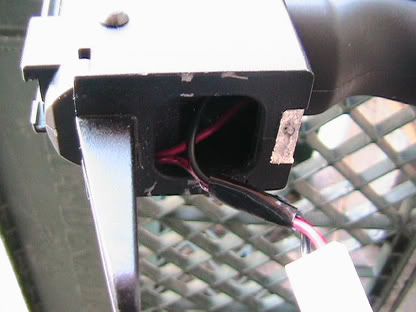

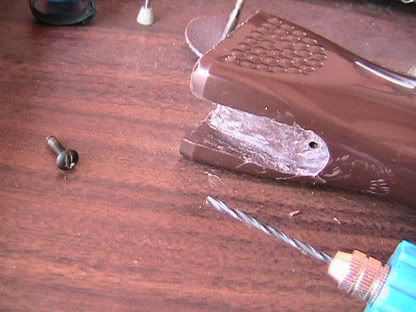
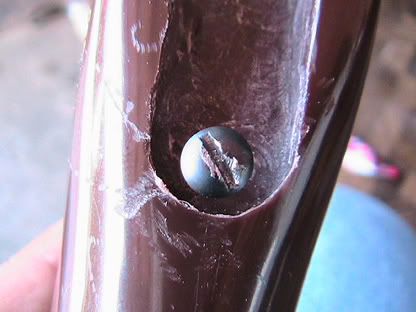
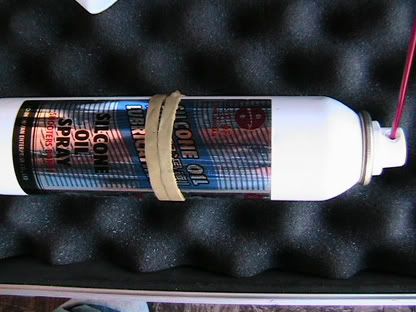
I continued on working on the top stock tang area. Fitted the stock tang as best as I could. Got out the drill bit and drilled a hole for the stock screw, after measuring it's percise location. Put in the screw and it gave a lot of resistence. It was making the treading as it went in after all. Finally I got the stock on. There was no lower stock tang and a big ugly stock tang area . I will work it out somehow. I removed the stock screw, sprayed down the stock threads with silicon oil and rescrewed.

A minor mod, got rid of the tiny sling swivel and replaced it with the one off of my old Inokatsu kit. Works a lot better now.

I was technically finished, now. Glamour shots:
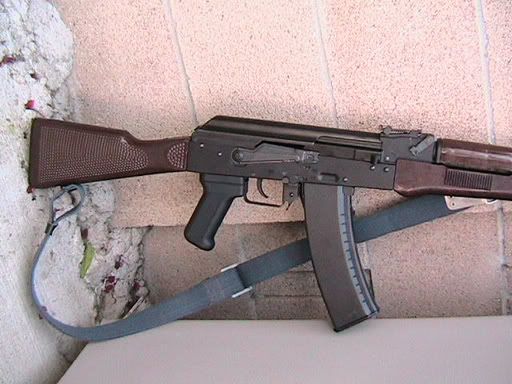

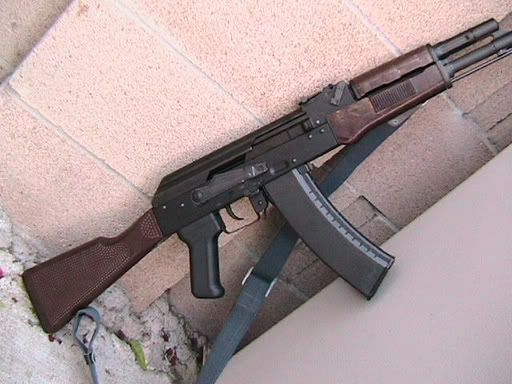

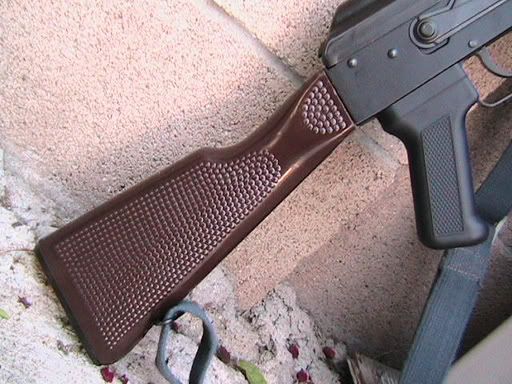


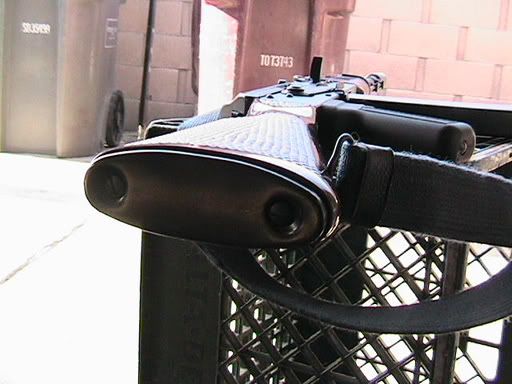
*EDIT* MPi KMS74 is done, for reals this time!
I solved my broken lower stock tang problem. Story is, I was out with some buds on our way to a place, we passed by the bridge that goes over the
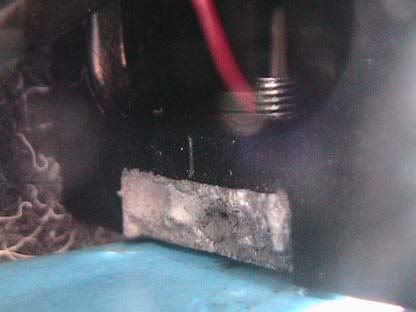
Santa Ana river right by where were live, which is hardly a river. It's bearly a stream, it's sort of like the LA river with all the concrete. The sides are sloped, so people go down there. We went down there and while I was down there I found this small piece of metal. Not sure what it was, at on end it sort of went inwards all triangular like then cuved to a point. Now I tired working some thick wood and metal before to no avail. I picked this thing up and took it home. I did a test cut and my dremel seemed to be cutting it real easy. I cut the curved point off, cut some metal off of the opposite side. I wrapped that beotchin blue tape because it was pretty shiny. I think it might have been shoe scrapper or something.
With the metal ready, I drilled a hole in the bottom of the reciever behind the pistol grip and used a screw and nut to hold the metal piece in place.


You can kind of see screw right behind the gearbox. Good thing it dosen't get in the way of anything either.
Only adjustment I had to do to my stocks was drill new holes and get out one new screw.


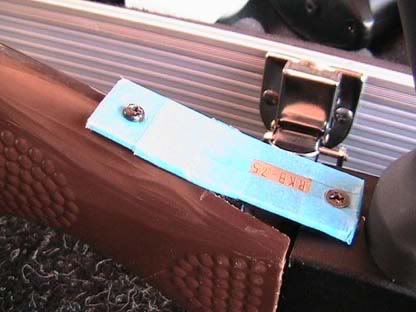
It's not the best looking thing, but it attaches the stock to the gun firmly again. I did my best to bend the piece of metal with a hammer to match
the curvature of the stock a bit. I plan to wrap something around it so you can't tell it's there. Also might take the metal bit off and cut it down at the sides to slim it down for a less noticeable look.
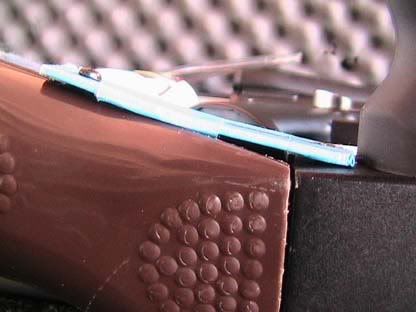
Here's one idea. Kami Kaze, show them no fear! (< retarded I know)


New look, now even more ribbed.....For her pleasuer, he he he alriiiiiiiiiight.
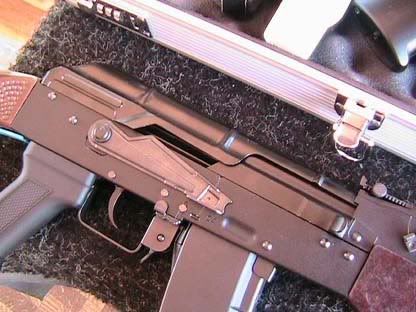

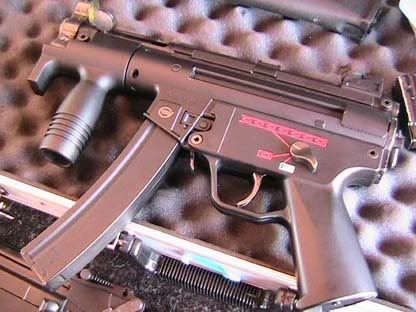
Also got her a play mate
Now Glamour shots, wiff a good camera.
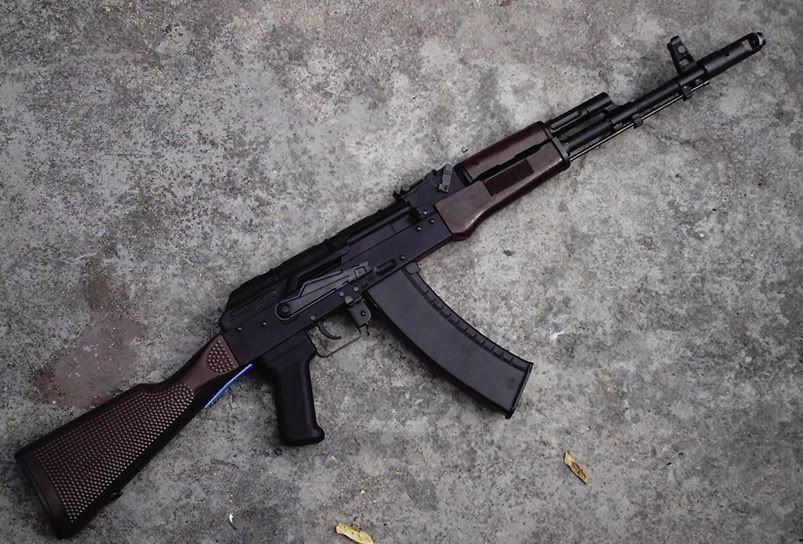


Future plans for the MPi K Family: MPi KM using a CYMA CM.031 and real steel parts. Awesome.
Comments? Questions?

I will most likely stay away from Bakelite mags, but there is always the possibility. [EDIT- I will probably obtain one and dye the stock and upper handgaurd and a new pistol grip dark brown to match the bakelite handguard]
Soldier traning with his MPi KM
www.gun-world.net/russain/kalash/foreign/ddr/20050710adf.jpg
Soldier during the Iraqi elections.

Iraqi practices with the MPi KM

Many MPi KM's dissappeared from DDR armoury stocks after the fall of the Berlin wall and the reunification of Germany. Many have been seen all over the world, many have turned up in the middle east and in asia. Even Finland has picked up a few MPi KM's for it's Army. Many MPi KM's while being decades old, are in mint condition. MPi KM's are one of the finest built AK rifles being up there with Russian and Bulgarian made AK's.
I had had seen the MPi KM furniture much earlier, didn't have much intrest in it, though the more I saw it the more fascinating it became. A guy who goes by the handle of DJ Mike Oz went and started a custom job, as many others were doing custom jobs to their AK's. I decided to do something unique and went with the MPi KM furniture. I looked around, finally found a great price on the furni, almost bought the set for $68 from another place. I ended up paying about $68 for the set but shipped and with a nice E. German blue sling.
It sat in the closet for a bit until I bought a mini grinder/dremel from ebay. I waited one week until it arrived. The dremel looked cheap and crappy, but I went ahead and got it out and prepared for a day of modding.

I got my box out with the MPi furni and got it ready for it's modding. It was a shame I can never use the pistol grip, it's quite nice. It's about half the width of the AS pistol grip.

Got my gun case out, I like to keep it secured. I had my AK on hand to make quick adjustments and for easier fitting of the new furni.

I normaly keep my gun case full of stuff, I just find it easy to keep a few things in there so I don't have to look around for stuff in my "Airsoft Stuff" boxes.


Partially field stripped my gun, again to make quick adjustments to create the best fit possible for the new furni. Earlier in the month I had taken the gun completely apart, put the RS lower handguard on the front and marked what excesses would be cut away. I suggest you do this if you are going to do something similar with a RK.

This was my work station for the rest of the day, the dremel was for indoor use and thus had to be plugged in, no matter, I had an outlet near by. I was working, blasting some good tunes, and creating something sexi.

I cut along the lines I had marked on the lower handguard and removed the excess bakelite from the tab at the end. The dremel took the bakelite on with no resistence. The bakelite dust and cut area ressembled wood which I found intresting.


I got the tab just about right, having the gun on hand to make quick changes, I found that the tab needing more resizing.

I don't know about you guys, but I get ghetto birds (police helicopters) coming around often.

After going at the lower handguard for an hour or so I had pretty much finished modding it.

I had finished the back end, also sanded down the back of the handguard for it to be even and allow a clean fitment onto the gun. I also cut a bit of the tab itself off because it left a small gap between the handguard end and the reciever and didn't line up to the locking lever. Again, we can see the bakelite looking like wood.
I managed to close the gap between to the lower handguard end and reciever, now it's not noticeable at all. Only when you get real close and examine it closely. With the lower handguard in place, I had to adjust the front end to fit the retainer. I ditched the retainer spring as I had no use for it on an airsoft AK. I cut of a few mm of the lip, got out the sander and thinned the lips until the retainer was in place and the locking lever was good to go. The locking lever had no place to lock into since the handguard wall was in the way. I carved out an opening for it so the locking lever could engage a lock of the lower handguard. Also made a cut for a screwdriver tip to release the locking lever.


I got the lower handguard in place, it is pretty much done. I will take a sander to it a bit more to make placement and removal easier. The inside of the lower handguard snuggly hugs the outer barrel. The locking lever is in place and working. You can see the adjustments that were made to accomadate the lever.


Along with being able to switch out the lower handguard, when using the MPi lower handguard, I don't need to use the little H piece that keeps the cleaning rod in place. The hole at the front of the lower handguard all the way to the rear of it keep the cleaning rod in place and looking good. Only downside to that is that I have to remove the FSB to remove the lower handguard because I can get the muzzle break off, thus the cleaning rod prevents easy removal of the lower handguard. I hope to fix this.

The MPi set came with a the upper handguard on the gas tube. The gas tube would fit on the RK with some modding, but the dremel which was supposed to be able to cut metal, didn't to much to it when I tested it. I decided to put it off and moved on to the stock. The damage you see to the gas tube is from me trying to remove the upper handguard from it from an earlier try.

To the stock, the battle plan was simple. Attack the front. The stock is plastic, quite thick in places. I had made several cut in various places and gave up and made a new cut elsewhere. I was pissed that the plastic was giving me a hard time. It's not any easier because it's plastic. There are two step like parts at the fron of the stock, I would have to take out one step then the other. Since the dremel wasn't being effective at cutting on the flat surface, I attacked the corners. Progress here was slow but steady. It combined one thing I like and one thing I like (like=sitting on my ass, dislike=waiting along time for s***). I also had to stop often here because the plastic that was being cut chipped, melted and stuck to the cutting wheel where it instantly cooled down and bonded too.


I had started working on the stock from about 10 AM, it was around noon when I took a lunch break. I had me that panini thing I keep seeing on the tv with it's "uber cool" grilling tray in the microwave. I wasn't totally impressed, tho it was good. Also had me a side of dinosaur shaped chicken nuggets, what's manlier than that? Mmmmm, Dr. Pepper.

During this time I went over to a sexi fourm, read a sexi review written by a sexi guy about a sexi gun while listening to a sexi song. It was a sexi time.

I got of my ass, and planted my ass back infront of the work area. I managed to get the first step off, it wasn't that much work, just a lot of waiting. When it was weakened structually, I banged it on the ground and big pieces came off. I cleaned the end up of any big pieces still left.

I attacked the second step, the plastic here was pretty thick and progress was even slower. The thick upside down T area from the previous pic, slowed me down the most. I attacked it from the front again, and then from the sides. I weakened it structually again and banged it until big chunks of it came off. This step I took hours on. Also didn't help that the cutting wheel was pretty frail and I broke them all by the end of the day. One even broke while I was still working and hit me in the face. Good thing for my shirt and eye protection.


I thought about calling it a day, I said F*** it. I continued on.

Back to the stock, here you can see all the broken pieces from the stock "steps" and a few broken cutting wheels and ass loads of shavings and dust.

There was a pesky support inside of the stock that would impede any entering battery pack. I had to knock it out but the dremel couln't finish the job so I went at it with the screwdriver. I noticed that part of the inside of the stock was coming out. I said sh**, I see. I unscrewed the rear sling swivel and tugged until something came out. I got the part out, cut out the support. I like how that part had the threads for the butt plate screws. I popped it back in, aside from that one support on the part and a couple up at the very front (seen in the previous pictures of the front of the stock), the stock is hollow. Just have to be careful of one of the sling swivel screws that could dig into the battery pack.


After that I wanted to call it quits for the day, again. I decided to try and get the upper handguard ready to go. After screwing with it trying figuring out a way to get it off of the gastube, I made it weak. Pounded the gas tube with a hammer, attacked the retainer lips and went to work with it with the dremel. It did cut metal, just at a slower pace than it did with the plastic. Finally I freed the upper handguard.


I then got the gas tube and retainers from the RK out to the table and sanded down and cut the lips at the front of the upper handguard. I came close to a good fit, then end of the upper handguard fit nicely right off the bat. I put the MPi upper handguard on the RK's gas tube and reatiners and put it on the gun, there was resistence but I pushed it and got it to fit into place. I then locked it in place with the locking lever for the upper handguard. I'll have to go back and sand it down some more for easier removal. The important thing is I got it on there.

There's rough spots on the modding areas, but not enough to really bug me or ruin the gun's beauty. The first rough spot is the front of the upper handguard and the retainer. Ther rest will be on the stock. One thing about the handguards, the upper is a bright brand new looking brown plastic as is the stock, the lower handguard is a worn dark brown bakelite. This dosen't bother me, it's the space between the upper and lower. I wish the upper came down a bit more.


I got back to working on the stock, I finally called it quites as the sun was setting. Took some pictures and then I called it quits for the day. The time was 8:15 PM. I took today off because I broke the cutting wheels, and because my hands are sore as hell. I got some new cutting wheels and I'm going at it again tomorrow.

Here are the results of today's work: Got the handguards on and the stock now only needs the modding for the stock tangs.


There is still more to be done.
Future prospects:
Mod a RS AK74 FSB and use a AK74 muzzle break
Mod a RS AKM FSB and use a AKM slant muzzle break, creating the MPi KM (E. German AKM)
Use of a AK74 stock and Bakelite mags.
G&G 104 front end
RS AK74 wood kit
RS AKM wood kit
I orignally wanted to make the MPi KM, but issues with the front of the RK103 impeded this. I will find a way, acquire fund and make this possible
[EDIT- AK74 FSB and muzzle break is still possible but approx $150ish, i dunno. AKM FSB and slant muzzle, meh don't feel like chopping the barrel and threading. AK74 laminated RS wood is hella expensive so screw that, maybe Inokatsu. AKM wood is still quite possible]
EDIT: "Almost" COMPLETE *Vodka chug* Cheers!
I took the dremel to the end of the stock and wore away the bulges left over from the stock "steps".


So to prepare for mounting the stock, I raced out the stock tangs on a piece of paper so I could make measurements. I got out some of the other attachments for my dremel, it was a good Idea. I used this piece to ware away the front of the stock tang to enlongate it to accomodate the RK's stock tang. I used some tape to avoid scratching up the stock. It got in the way so I ditched it later on. On the bottom I taped a piece of tape with the sock tang drawn on for easy dremeling out an area for the lower sock tang.


After going at it for a while I had gotten the stock tang ready. The end of the stock tang was where the tip of the screwdriver was. I later went back at it with the dremel to get it good. The hard pat was dremeling out an area for the lower stock tang. It was slow work done over a couple days period of working on it for a couple hours. I got it dremeled out and ready.


The bottom stock tang was kind of hard, the angle of the stock and it's hollowness made it a harder task. I dremeled as deep enough as I could, but it wasn't going so well. As we can see in this one picture, you can see light going through the oh so thin stock wall. I had to stop at that point. I tried getting the stock on the gun, it was a no go.


I went back to the top stock tang. I didn't want to proceed with the bottom because the stock tang area would be too weak and there were no supports there. The top did have a big thick T shape support right at the tang area. I went at it for a bit, I tried the getting the stock on and I kept coming really close. I got so close at one point that I went for it. The bottom of the stock is angled, this bent the lower stock tang until it broke. The only flaw I find in the G&G RK's is that the body material could have been better. Magnesium is nice and strong enough, but Steel would have been the obvious choice. I spent no time on this loss, I had a job to finish. I would have to fix it up somehow later. After a small chat with joe, I had a few ideas going on how to fix the problem. The fix being covered up with the glorious BLUE DUCT TAPE.


I continued on working on the top stock tang area. Fitted the stock tang as best as I could. Got out the drill bit and drilled a hole for the stock screw, after measuring it's percise location. Put in the screw and it gave a lot of resistence. It was making the treading as it went in after all. Finally I got the stock on. There was no lower stock tang and a big ugly stock tang area
 . I will work it out somehow. I removed the stock screw, sprayed down the stock threads with silicon oil and rescrewed.


A minor mod, got rid of the tiny sling swivel and replaced it with the one off of my old Inokatsu kit. Works a lot better now.

I was technically finished, now. Glamour shots:


*EDIT* MPi KMS74 is done, for reals this time!
I solved my broken lower stock tang problem. Story is, I was out with some buds on our way to a place, we passed by the bridge that goes over the
Santa Ana river right by where were live, which is hardly a river. It's bearly a stream, it's sort of like the LA river with all the concrete. The sides are sloped, so people go down there. We went down there and while I was down there I found this small piece of metal. Not sure what it was, at on end it sort of went inwards all triangular like then cuved to a point. Now I tired working some thick wood and metal before to no avail. I picked this thing up and took it home. I did a test cut and my dremel seemed to be cutting it real easy. I cut the curved point off, cut some metal off of the opposite side. I wrapped that beotchin blue tape because it was pretty shiny. I think it might have been shoe scrapper or something.
With the metal ready, I drilled a hole in the bottom of the reciever behind the pistol grip and used a screw and nut to hold the metal piece in place.


You can kind of see screw right behind the gearbox. Good thing it dosen't get in the way of anything either.

Only adjustment I had to do to my stocks was drill new holes and get out one new screw.


It's not the best looking thing, but it attaches the stock to the gun firmly again. I did my best to bend the piece of metal with a hammer to match
the curvature of the stock a bit. I plan to wrap something around it so you can't tell it's there. Also might take the metal bit off and cut it down at the sides to slim it down for a less noticeable look.


Here's one idea. Kami Kaze, show them no fear! (< retarded I know)


New look, now even more ribbed.....For her pleasuer, he he he alriiiiiiiiiight.


Also got her a play mate

Now Glamour shots, wiff a good camera.


Future plans for the MPi K Family: MPi KM using a CYMA CM.031 and real steel parts. Awesome.
Comments? Questions?